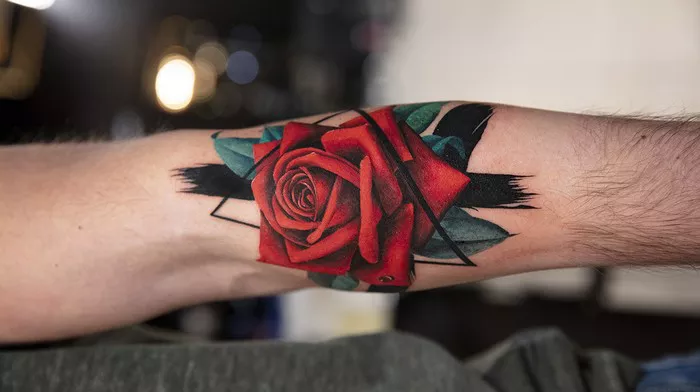
Rose tattoos are timeless symbols of beauty, love, and resilience, making them one of the most popular choices in body art. This guide delves into the intricate process of drawing rose tattoos, covering everything from initial concepts to advanced techniques. Whether you’re a budding artist or an experienced tattoo designer, you’ll find valuable insights to enhance your skills in this floral tattoo style.
Understanding the Symbolism of Roses
The Significance of Roses in Tattoo Art
Roses carry profound meanings that vary across cultures and contexts. Common interpretations include:
Love and Passion: Often seen as symbols of romantic love.
Beauty and Elegance: Their intricate petals embody grace and allure.
Resilience: The thorns symbolize strength and protection.
Variations and Their Meanings
Red Roses: Love and passion.
Black Roses: Mourning or rebirth.
White Roses: Purity and innocence.
Yellow Roses: Friendship and joy.
Gathering Inspiration and References
Exploring Different Styles
Before starting your design, explore various tattoo styles that incorporate roses, including:
Traditional: Bold lines and vibrant colors.
Realistic: Detailed shading and lifelike representation.
Watercolor: Soft, flowing colors that resemble a painting.
Minimalist: Simple lines and shapes for a modern touch.
Collecting Reference Images
Tattoo Art Books: Use these for inspiration and understanding various techniques.
Online Galleries: Websites and social media platforms like Instagram and Pinterest are great for visual references.
See also: Designing a Polynesian Tattoo: A Guide to Cultural Artistry
Essential Tools for Drawing Rose Tattoos
Drawing Supplies
Pencils: Graphite pencils in various hardness for sketching and shading.
Fine Liners: For inking your final design.
Erasers: Kneaded erasers for gentle corrections.
Paper: Choose high-quality paper that can handle ink and erasing.
Digital Tools
Drawing Tablets: If you prefer digital art, tools like Procreate or Adobe Illustrator are excellent for tattoo designs.
Software: Familiarize yourself with programs that offer layers, allowing for easier adjustments.
Step-by-Step Guide to Drawing a Rose Tattoo
Step 1: Basic Shape and Structure
Sketch the Outline: Begin with a circle for the flower’s center and a larger circle around it for the overall shape.
Add Guidelines: Draw light lines to indicate the direction of the petals.
Step 2: Creating Petals
Draw the Petals: Starting from the center, draw overlapping petal shapes, varying their sizes for a natural look.
Refine the Shape: Smooth out the edges and adjust the petals for a more organic feel.
Step 3: Adding Details
Texture: Include details like veins and slight curves in the petals to add realism.
Thorns and Leaves: Sketch the stem with thorns and leaves, maintaining the overall flow of the design.
Step 4: Inking the Design
Choose Your Ink: Use fine liners or a brush pen for clean lines.
Outline the Sketch: Carefully trace over your pencil lines, adding thickness to the outlines where needed.
Step 5: Shading and Color
Shading Techniques: Use hatching, cross-hatching, or stippling to create depth.
Color Application: If coloring, choose a palette that reflects your intended symbolism and style.
Step 6: Final Touches
Review and Refine: Make any final adjustments to ensure balance and harmony in the design.
Clean Up: Erase any remaining pencil marks and prepare the design for presentation.
Techniques for Different Rose Styles
Traditional Rose Tattoo Techniques
Bold Outlines: Focus on thick black lines to create a striking appearance.
Vibrant Colors: Use saturated colors to enhance the visual impact.
Realistic Rose Techniques
Blending: Employ smooth transitions between colors and shades to mimic natural petals.
Depth and Shadow: Add shadows beneath the petals to create a three-dimensional effect.
Watercolor Rose Techniques
Brush Strokes: Use a brush or waterbrush to create soft edges and flowing colors.
Layering: Apply multiple layers of color for a more dynamic appearance.
Minimalist Rose Techniques
Simplicity: Focus on clean lines and basic shapes.
Negative Space: Utilize empty spaces to enhance the design’s impact.
Common Challenges in Drawing Rose Tattoos
Achieving Realism
Practice Observation: Study real roses or photographs to understand their structure and details.
Experiment with Techniques: Try different shading and blending methods to find what works best for you.
Maintaining Proportions
Use Guidelines: Rely on light guidelines to keep your proportions accurate.
Scale Comparisons: Regularly check the size relationships between elements.
Color Choices
Choosing the Right Palette: Experiment with color combinations to find those that resonate with your theme.
Testing on Scraps: Practice color application on scrap paper before committing to your final design.
Showcasing Your Rose Tattoo Designs
Creating a Portfolio
Document Your Work: Take high-quality photos of your designs for a portfolio.
Diverse Styles: Include various styles to showcase your versatility.
Sharing Online
Social Media: Share your designs on platforms like Instagram and TikTok to reach a broader audience.
Tattoo Conventions: Consider attending conventions to network and showcase your work.
Conclusion
Drawing rose tattoos is an art form that combines creativity, symbolism, and technical skill. By understanding the meanings behind roses, mastering drawing techniques, and exploring various styles, you can create stunning tattoo designs that resonate with wearers and convey deep personal significance. Embrace your artistic journey, and let your creativity bloom through the timeless beauty of rose tattoos.
This guide provides a detailed framework for creating beautiful rose tattoos, ensuring that your artistry reflects both skill and personal expression.
You Might Be Interested In
Designing the Perfect Full Sleeve Tattoo: A Full Guide
Crafting the Perfect Name Tattoo: A Full Guide Introduction
Mastering the Art of Cover-Up Tattoos: A Comprehensive Guide

