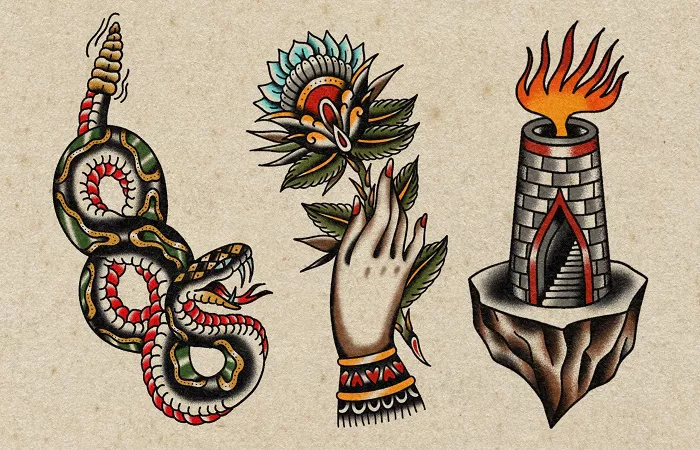
Traditional tattoos have a rich and storied history, spanning across cultures and generations. Designing these tattoos is not merely about putting ink on skin; it is a meticulous process that combines art, symbolism, and a deep understanding of traditional motifs.
Core Elements of Traditional Tattoos
Bold Lines
The foundation of traditional tattoos lies in their bold, thick lines. These lines not only define the shape of the tattoo but also give it a sense of durability and prominence. They are often drawn using a single needle or a small grouping of needles to ensure a clean and sharp result. The thickness of the lines can vary depending on the overall design and the desired emphasis. For example, in a traditional nautical star tattoo, the outer lines are usually very bold to make the star stand out clearly against the skin.
Vibrant Colors
Another hallmark of traditional tattoos is the use of bright, vivid colors. These colors are carefully chosen to create a visually striking effect. Red, blue, green, and black are among the most commonly used colors in traditional tattoo designs. Each color often carries its own symbolic meaning. Red, for instance, can symbolize passion, courage, or love in different cultural interpretations. The colors are applied in a solid, opaque manner to enhance their vibrancy. They are typically laid down in layers, with the lighter colors applied first and then the darker ones on top to build depth and dimension.
Symbolism
Traditional tattoos are replete with symbolism. Every image and motif has a specific meaning attached to it. For example, the anchor in a traditional tattoo often represents stability, security, and a connection to the sea, which was of great importance to sailors in the past. The swallow is a symbol of freedom, travel, and return, as swallows are migratory birds. Understanding these symbols is crucial when designing a traditional tattoo. The client’s personal values and stories can be translated into appropriate symbols to create a meaningful and personalized tattoo.
Sketching the Design
Initial Rough Draft
Start with a rough sketch on paper. This is a free – flowing stage where you can experiment with different compositions, sizes, and placements of the elements. If the tattoo is going to be a sleeve, for example, you need to consider how the individual elements will flow together to create a cohesive whole. At this stage, don’t worry too much about the details; focus on getting the general shape and layout right. Use a pencil so that you can easily make changes.
Refining the Sketch
After the initial rough draft, it’s time to refine the sketch. Add more details to the elements. If it’s a traditional floral tattoo, draw the petals more precisely, showing their curves and texture. Pay attention to the negative space as well. The areas between the elements can be just as important as the elements themselves in creating an aesthetically pleasing design. Erase any unnecessary lines and make the overall drawing cleaner and more defined.
Proportions and Scale
Ensure that the proportions of the elements are correct. In a traditional dragon tattoo, for example, the body should be in proportion to the head, wings, and tail. Also, consider the scale of the tattoo in relation to the body part where it will be placed. A large, elaborate design may not be suitable for a small area like the wrist, while a small, simple design may get lost on a large back piece.
Choosing the Right Font
Font Style
Traditional tattoos often use fonts that have a classic, bold, and easy – to – read style. Script fonts with a lot of flourishes are popular for names or short phrases. However, the font should complement the overall style of the tattoo. If the tattoo has a nautical theme, a font that looks like it could be found on an old ship’s logbook would be appropriate.
Size and Spacing
The size of the font needs to be in proportion to the rest of the design. The letters should be large enough to be legible but not so large that they overshadow the other elements. The spacing between the letters also matters. There should be a consistent and appropriate amount of space between each letter to create a harmonious look.
Finalizing the Design for Transfer
Cleaning Up the Sketch Digitally (Optional)
Some tattoo artists prefer to scan the hand – drawn sketch and clean it up using graphic design software. This can make the lines even more precise and allow for easy adjustments. However, this step is not necessary if the hand – drawn sketch is already of high quality.
Creating a Stencil
The most common way to transfer the design onto the skin is by creating a stencil. First, trace the final design onto a thin, transparent paper using a special tattoo – transfer marker. Then, apply a thin layer of stencil solution to the skin area where the tattoo will be placed. Carefully place the traced design, ink – side down, on the skin and press firmly. When you lift the paper, the design will be transferred onto the skin in reverse. This stencil will serve as a guide for the tattoo artist during the inking process.
Conclusion
In essence, the meticulous process of designing traditional tattoos is a blend of ancient wisdom and contemporary creativity. It bridges the gap between cultural legacies and individual self – expression. As we navigate through bold lines, vivid hues, and profound symbols, we unlock the potential to create not just tattoos, but stories inscribed on skin. This art form, with its detailed design steps, enriches the world of body art, inviting all to partake in the beauty of tradition – inspired creations that will be cherished for a lifetime.
Related topics

